Get Started
Creating your Enta account takes about a minute and needs no password. This guide walks through every screen you’ll see when signing up as an individual — including the screens that only show up in edge cases, like when a device can’t create a passkey, or a resend gets rate-limited — so you always know what’s happening and why.
There are 4 steps in the flow (you’ll see a step counter at the top of most screens), made up of 15 individual screens.
1. Choose who this account is for
 This is the first screen you land on. It reads “Sign up on Enta” with the subtext “Three steps to a wallet that holds USD₮ and Bitcoin. Takes one minute”.
Under “Who’s this account for?” you’ll see two cards:
This is the first screen you land on. It reads “Sign up on Enta” with the subtext “Three steps to a wallet that holds USD₮ and Bitcoin. Takes one minute”.
Under “Who’s this account for?” you’ll see two cards:
- For me — A personal wallet
- For my business — A wallet for a company
Pick For me to go through the individual flow this guide covers. On the right, a panel reminds you what you’re getting: “Your wallet, ready in minutes”, with two callouts — “Hold, send, receive straight away — ready as soon as your passkey is set” and “You hold the keys — we never see them, locked to your device”.
Already have an account? Use Sign in in the top-right corner instead of signing up again.
2. Confirm your selection and continue
 Once you tap For me, the card highlights to show it’s selected, and a short helper note appears underneath it: “Hold, send, and receive USD₮ and Bitcoin as soon as you finish signup. Verify identity later if you want fiat accounts.”
This is confirming two things upfront: you get full use of your crypto wallet the moment you finish signing up, and identity verification (to unlock NGN/GBP/EUR fiat accounts) is a separate, optional step you can do later — it never blocks you from using the wallet.
Click Continue to move on.
Once you tap For me, the card highlights to show it’s selected, and a short helper note appears underneath it: “Hold, send, and receive USD₮ and Bitcoin as soon as you finish signup. Verify identity later if you want fiat accounts.”
This is confirming two things upfront: you get full use of your crypto wallet the moment you finish signing up, and identity verification (to unlock NGN/GBP/EUR fiat accounts) is a separate, optional step you can do later — it never blocks you from using the wallet.
Click Continue to move on.
Enta checks at this point whether your current device can create a passkey. If it can, you’ll go straight to Step 3 below (entering your email). If it can’t, you’ll see the screen described next.
3. If your device can’t create a passkey
 If Enta detects your device or browser doesn’t support passkeys, you’ll see “This device can’t sign you up”, with the explanation: “Enta uses passkey instead of a password. We couldn’t find any of those on this computer. We have alternative(s) below.”
You’re given two ways forward:
If Enta detects your device or browser doesn’t support passkeys, you’ll see “This device can’t sign you up”, with the explanation: “Enta uses passkey instead of a password. We couldn’t find any of those on this computer. We have alternative(s) below.”
You’re given two ways forward:
- Use your phone — scan a QR code and approve on your phone with Face ID or Touch ID
- Use a different device — another laptop with Touch ID or Windows Hello
A side panel explains why this is necessary: your Enta wallet is locked to your device using your face or fingerprint, the same way you unlock your phone — without that, there’s no safe way to hold funds on this device. It also lists what does work: an iPhone or Android phone with Face ID/fingerprint, a Mac with Touch ID, or a Windows PC with Windows Hello.
This screen only appears if your current device genuinely can’t support passkeys — most modern phones, Macs, and Windows PCs are already covered.
4. Continue on your phone
 If you tap Use your phone from the previous screen, a QR code dialog pops up on top: “Create a passkey on a phone or tablet” with the instruction “Scan this QR code with a camera on the device you want to create a passkey for Enta”.
Point your phone’s camera at the code, and your phone picks up where your computer left off — you’ll finish creating your passkey there with Face ID or Touch ID, and the session syncs back automatically once you’re done. You can back out at any time with Use a different device or Cancel.
If you tap Use your phone from the previous screen, a QR code dialog pops up on top: “Create a passkey on a phone or tablet” with the instruction “Scan this QR code with a camera on the device you want to create a passkey for Enta”.
Point your phone’s camera at the code, and your phone picks up where your computer left off — you’ll finish creating your passkey there with Face ID or Touch ID, and the session syncs back automatically once you’re done. You can back out at any time with Use a different device or Cancel.
5. Enter your email — Step 2 of 4
 This is where the step counter first appears, showing Step 2 of 4. The screen asks “What’s your email?” with the note “We’ll send a one-tap link.”
Enter your email address and click Send me the link. There’s no password field anywhere — Enta signs you in and up using a secure link sent straight to your inbox.
This is where the step counter first appears, showing Step 2 of 4. The screen asks “What’s your email?” with the note “We’ll send a one-tap link.”
Enter your email address and click Send me the link. There’s no password field anywhere — Enta signs you in and up using a secure link sent straight to your inbox.
Already have an account? Click Sign in in the top-right corner instead.
6. Check your inbox
 After you submit your email, you’ll land on “Check your inbox”, confirming “Link sent to [your email address]”.
Open your email app, find the message from Enta, and tap the link — it brings you straight back into the sign-up flow. Underneath, you’ll see two helper prompts: “Didn’t get it? Check spam” and “Wrong email address? Use a different email”. The Resend option is disabled at first, showing a countdown like “Resend in 0:45”.
After you submit your email, you’ll land on “Check your inbox”, confirming “Link sent to [your email address]”.
Open your email app, find the message from Enta, and tap the link — it brings you straight back into the sign-up flow. Underneath, you’ll see two helper prompts: “Didn’t get it? Check spam” and “Wrong email address? Use a different email”. The Resend option is disabled at first, showing a countdown like “Resend in 0:45”.
7. Resend once the timer runs out
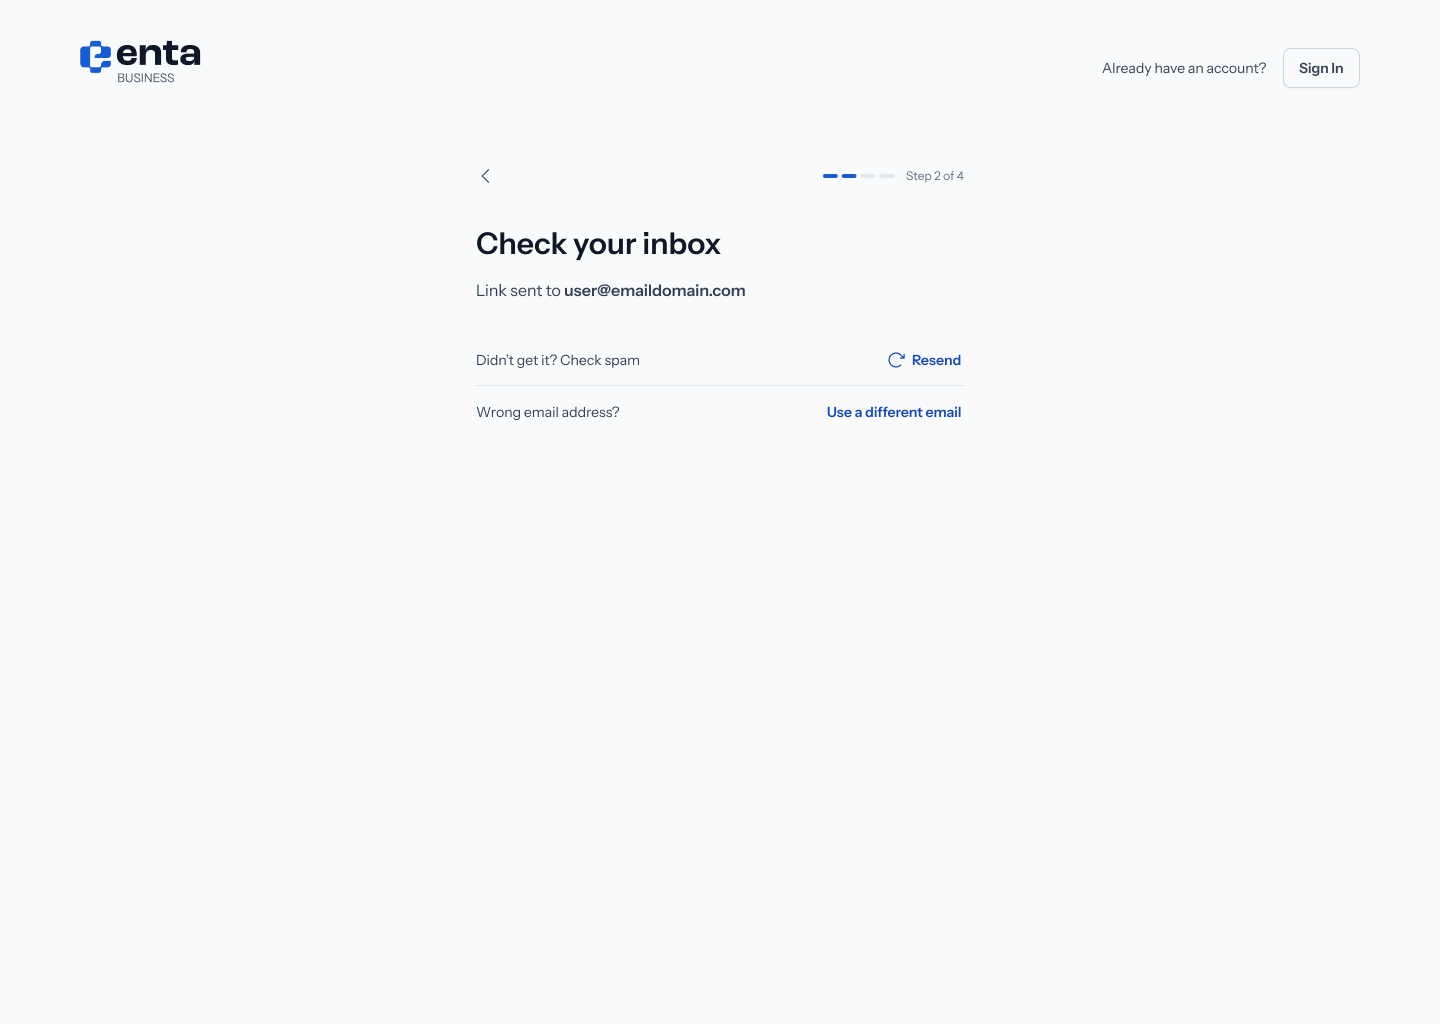 Once the 45-second countdown finishes, Resend turns active (blue, clickable). Everything else on the screen — the email address, the spam/wrong-email helper text — stays the same. Tap Resend if the original link never arrived.
8. If you resend too many times
 If you hit Resend repeatedly in a short window, Enta temporarily blocks further resends to protect your inbox from spam. You’ll see a red banner: “Too many resends. Try again in [x] minutes”, and the Resend button greys out again until that cool-off period passes.
If you’re stuck here, double-check you’re looking in the right inbox and your spam folder before waiting out the cool-off — or use Use a different email to start over with another address.
9. Secure your wallet — Step 3 of 4
 After verifying your email, you’ll reach Step 3 of 4: “Secure your wallet”, with the explanation “Create a passkey so only you can unlock your account. No password needed.”
You’ll see a card for your current device (e.g. “This Mac” — “Use this device biometrics to sign in”) with a badge noting it takes less than 30 seconds. Click Create passkey to continue — your device or browser will now ask you to confirm.
A side panel explains what a passkey actually is: “A passkey is a safer way to sign in. Your device or password manager stores it securely, and you unlock it with your face or fingerprint.” Two reasons it’s worth it: it can work across devices (Apple, Google, or your password manager can sync it for you), and it’s phishing-proof (passkeys only work on the real Enta site — never on a fake copy).
After verifying your email, you’ll reach Step 3 of 4: “Secure your wallet”, with the explanation “Create a passkey so only you can unlock your account. No password needed.”
You’ll see a card for your current device (e.g. “This Mac” — “Use this device biometrics to sign in”) with a badge noting it takes less than 30 seconds. Click Create passkey to continue — your device or browser will now ask you to confirm.
A side panel explains what a passkey actually is: “A passkey is a safer way to sign in. Your device or password manager stores it securely, and you unlock it with your face or fingerprint.” Two reasons it’s worth it: it can work across devices (Apple, Google, or your password manager can sync it for you), and it’s phishing-proof (passkeys only work on the real Enta site — never on a fake copy).
10. Confirm in your browser (Mac / Chrome)
 On a Mac using Chrome, clicking Create passkey brings up your browser’s own dialog on top of the Enta screen: “Create a passkey for Enta”, showing the email address you signed up with and the note “This passkey will only be saved on this device.” The main button behind it now reads “Awaiting browser input” while it waits for you.
Choose Continue to proceed, or Use a different device / Cancel if you want to create the passkey somewhere else.
On a Mac using Chrome, clicking Create passkey brings up your browser’s own dialog on top of the Enta screen: “Create a passkey for Enta”, showing the email address you signed up with and the note “This passkey will only be saved on this device.” The main button behind it now reads “Awaiting browser input” while it waits for you.
Choose Continue to proceed, or Use a different device / Cancel if you want to create the passkey somewhere else.
11. Confirm with Windows Security (Windows)
 If you’re on a Windows PC instead, you’ll see the native Windows Security dialog: “Making sure it’s you” — “Let’s save a passkey on this device to sign in to Enta as [your email]. This request comes from the app Enta by Shiga.” Windows then actively looks for your fingerprint or face with a “Looking for you…” prompt.
Follow your device’s prompt (fingerprint, face, or PIN) and click OK to finish, or Cancel to back out. A More choices link is available if you’d rather use a different sign-in method Windows supports.
If you’re on a Windows PC instead, you’ll see the native Windows Security dialog: “Making sure it’s you” — “Let’s save a passkey on this device to sign in to Enta as [your email]. This request comes from the app Enta by Shiga.” Windows then actively looks for your fingerprint or face with a “Looking for you…” prompt.
Follow your device’s prompt (fingerprint, face, or PIN) and click OK to finish, or Cancel to back out. A More choices link is available if you’d rather use a different sign-in method Windows supports.
12. Confirm with Touch ID (Mac / Chrome)
 Back on Mac/Chrome, after the browser dialog in step 10, Chrome asks you to actually verify it’s you: “‘Google Chrome’ is trying to verify your identity on Enta. Touch ID or enter your password to allow this.”
Use your fingerprint on Touch ID, or click Use Password… to confirm with your Mac login password instead. Once confirmed, your passkey is created and stored on this device — you won’t need to repeat this step to sign in again.
Back on Mac/Chrome, after the browser dialog in step 10, Chrome asks you to actually verify it’s you: “‘Google Chrome’ is trying to verify your identity on Enta. Touch ID or enter your password to allow this.”
Use your fingerprint on Touch ID, or click Use Password… to confirm with your Mac login password instead. Once confirmed, your passkey is created and stored on this device — you won’t need to repeat this step to sign in again.
13. Add a recovery email — Step 4 of 4
 The last step, Step 4 of 4: “Add recovery email”, explained as “In case you lose access to your primary email or passkey, you’ll use this to recover your account.”
Enter a recovery email — ideally different from the one you signed up with — then click Send Code. Enta sends a one-time verification code to confirm it’s really yours. Prefer to use a phone number instead? Toggle Use phone number instead to switch.
The last step, Step 4 of 4: “Add recovery email”, explained as “In case you lose access to your primary email or passkey, you’ll use this to recover your account.”
Enter a recovery email — ideally different from the one you signed up with — then click Send Code. Enta sends a one-time verification code to confirm it’s really yours. Prefer to use a phone number instead? Toggle Use phone number instead to switch.
Keep your recovery email (or phone) accessible and up to date. If you ever lose both your primary email and your passkey, this is your way back into your account — Enta can’t override it for you.
14. Confirm your recovery email
 Next, you’ll see “Enter recovery email OTP” with “We’ve sent verification code to [your recovery email]”. Type the 6-digit code into the boxes provided — it submits automatically once all six digits are entered.
The same helper prompts from email verification reappear here: “Didn’t get it? Check spam” with a Resend countdown, and “Wrong email address?” with a Use a different email link, in case you need to correct it.
Next, you’ll see “Enter recovery email OTP” with “We’ve sent verification code to [your recovery email]”. Type the 6-digit code into the boxes provided — it submits automatically once all six digits are entered.
The same helper prompts from email verification reappear here: “Didn’t get it? Check spam” with a Resend countdown, and “Wrong email address?” with a Use a different email link, in case you need to correct it.
15. You’re in
Once your recovery email is confirmed, your account is fully set up and you land on your Dashboard — your wallet home screen. While you were completing these steps, Enta was setting up your wallet in the background: no seed phrase, no manual wallet configuration, nothing extra for you to do.
From here, you have immediate, full access to your crypto wallet — you can hold, send, and receive USD₮ and Bitcoin right away, gas-free. Unlocking fiat accounts (NGN, GBP, EUR) is a separate, optional step you can complete whenever you’re ready, and it never blocks the wallet features you already have.
Want to unlock fiat accounts next? Head to the Onboarding guide for the identity verification (KYC) walkthrough. 
