
- Click “Send” to open the transfer interface.
-
To Fiat Account (Portal Out)
- Purpose: Convert stablecoins and receive local currency in a bank account
- Description: Send stablecoins and receive local currency in a bank account
- Available Currencies:
- GBP/EUR - British Pound and Euro
- NGN - Nigerian Naira
- Best for: Converting crypto to traditional currency
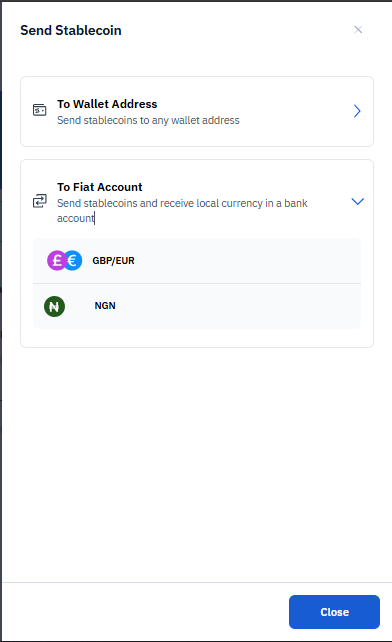
Step 1: Choose Your Send Method
When you initiate a stablecoin transfer, you’ll see two main options:Option A: To Wallet Address
- Purpose: Send stablecoins to any wallet address
- Description: Send stablecoins to any wallet address
- Best for: Crypto-to-crypto transfers
Option B: To Fiat Account (Portal Out)
- Purpose: Convert stablecoins and receive local currency in a bank account
- Description: Send stablecoins and receive local currency in a bank account
- Available Currencies:
- GBP/EUR - British Pound and Euro
- NGN - Nigerian Naira
- Best for: Converting crypto to traditional currency
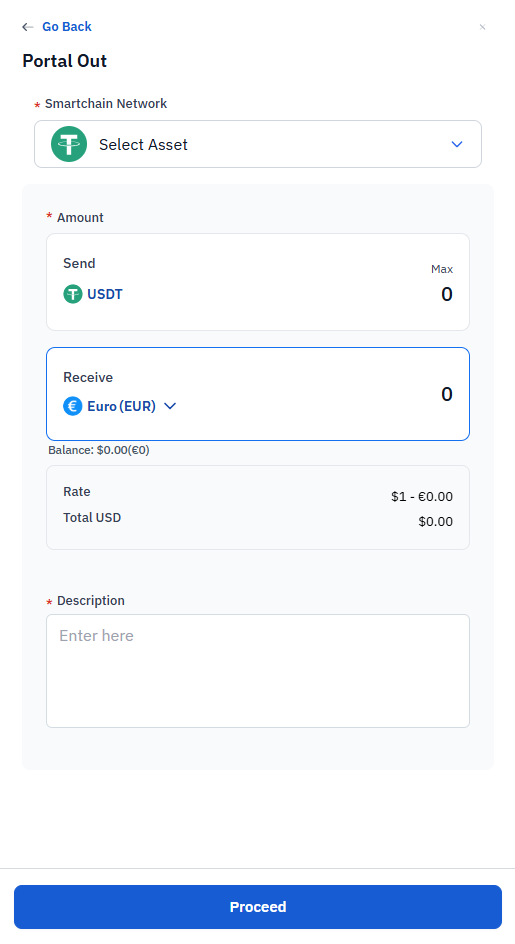
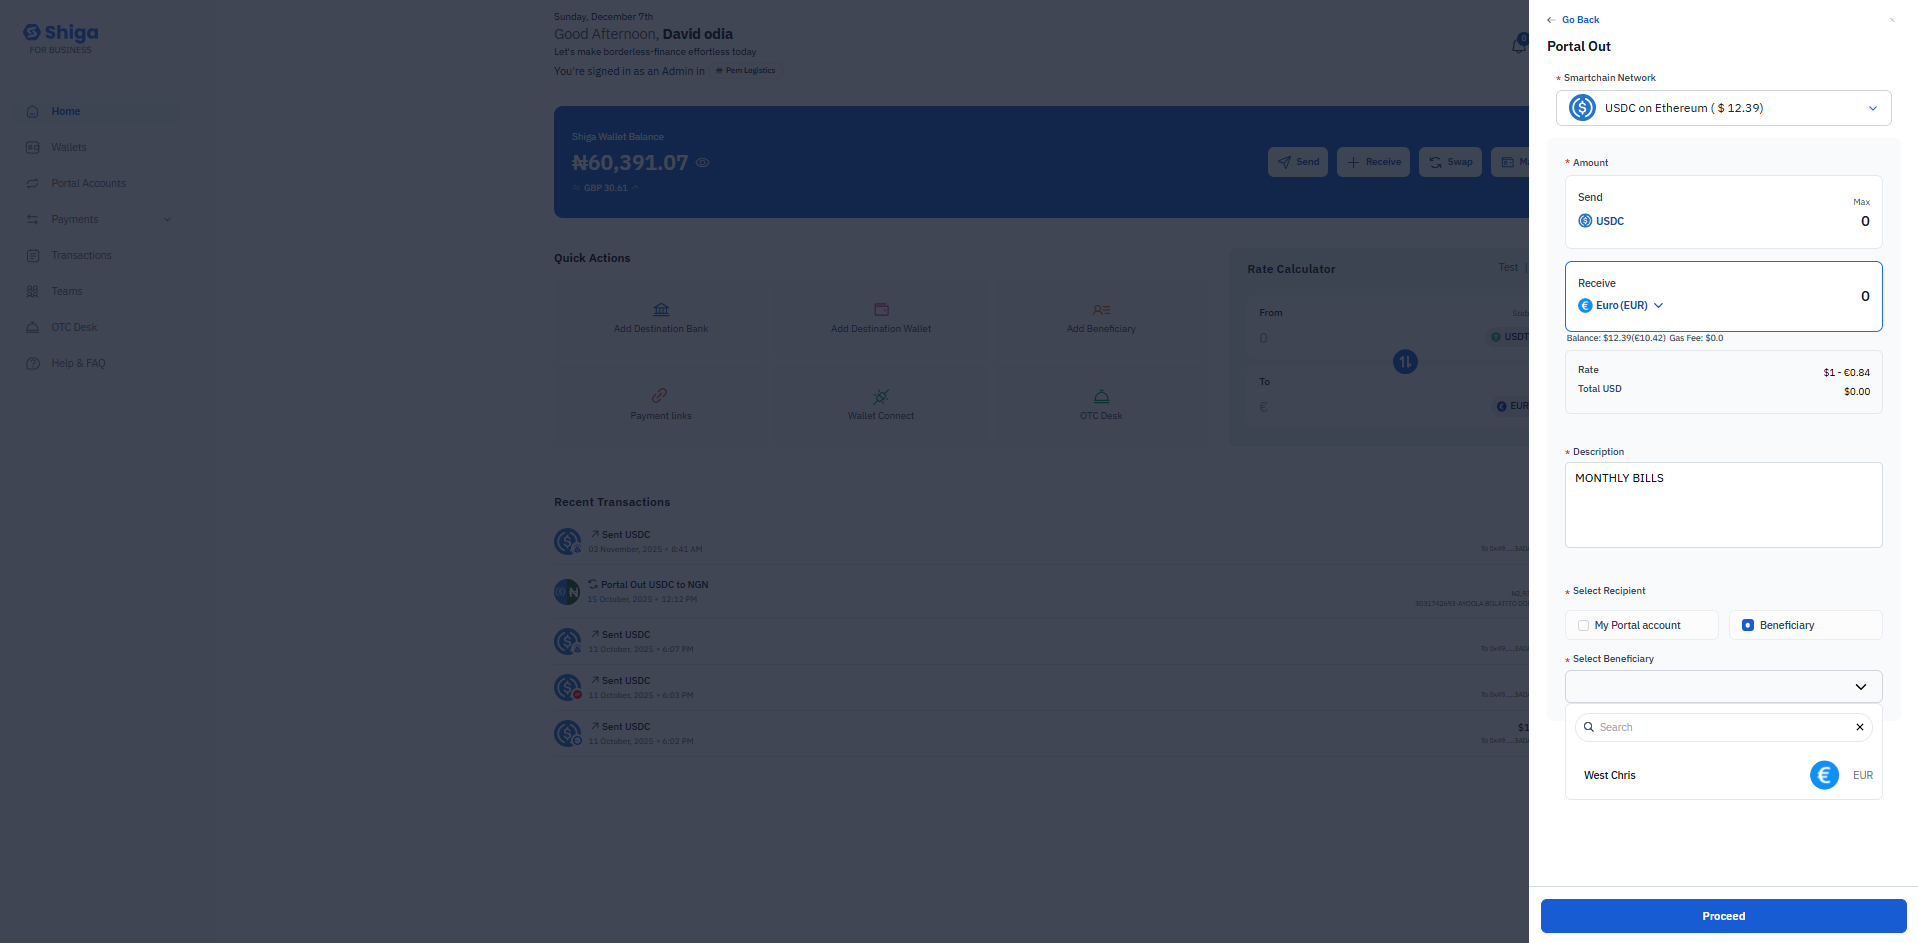
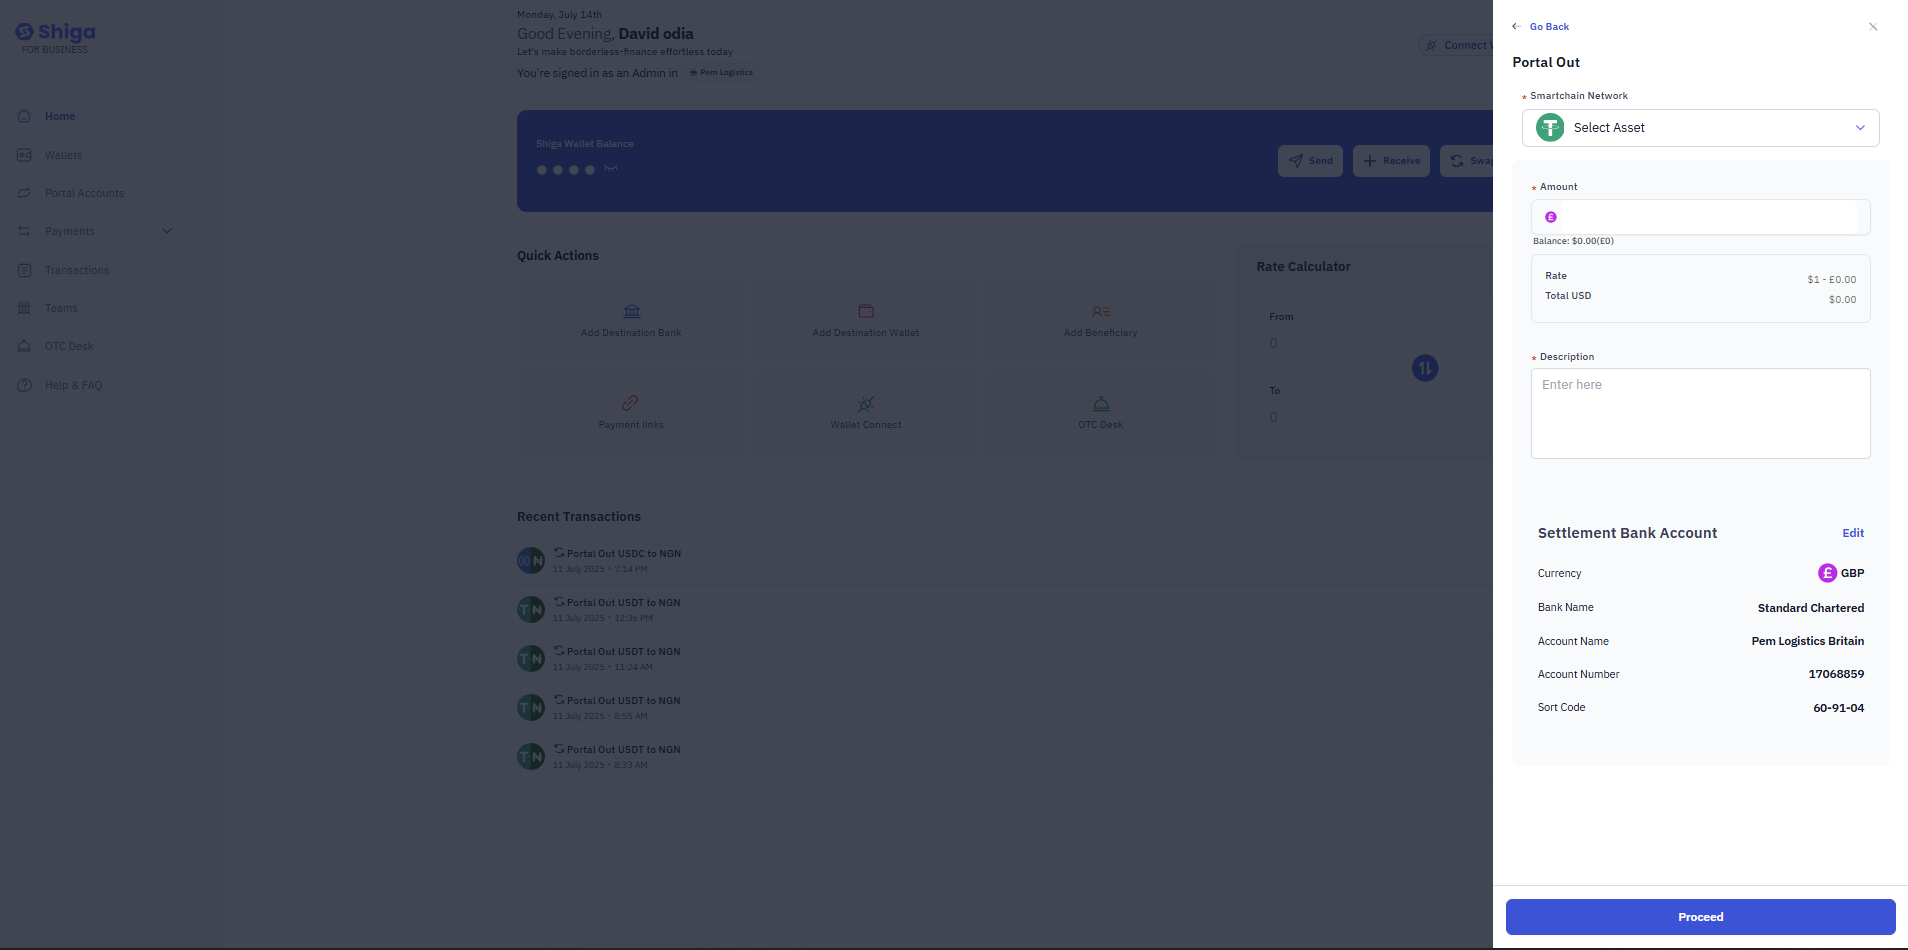
Step 2: Set Up Your Portal Out Transaction
Once you’ve selected “To Fiat Account,” you’ll be taken to the Portal Out configuration page.2.1 Select Your Smartchain Network
Field: Smartchain Network (marked with red asterisk - required) Options Available:- Click the dropdown menu labeled “Select Asset”
- Choose from available networks where you hold stablecoins
- The selected network will determine which cryptocurrency you’re converting
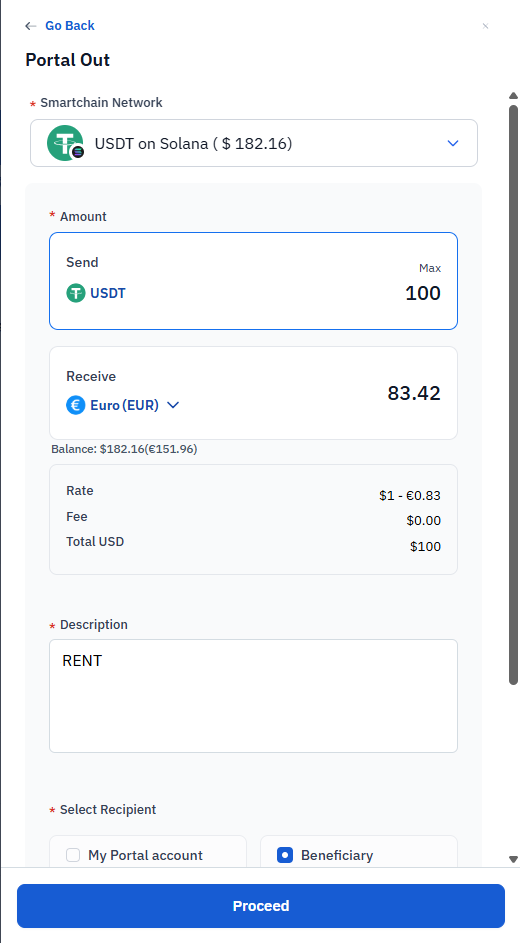
2.2 Enter the Amount to Send
Field: Amount (marked with red asterisk - required) This section has two parts:Send Amount:
- Label: “Send”
- Currency: USDT or USDC (depending on your selection)
- Input: Enter the amount you want to convert
- Max Button: Click “Max” to send your entire available balance
- Default Value: 0
Receive Amount:
- Label: “Receive”
- Currency: Euro (EUR) or other selected fiat currency
- Display: Shows the equivalent amount you’ll receive
- Currency Selector: Click the dropdown to change receiving currency if needed
- Default Value: 0
- Your current balance is shown below the receive field
- Example: “Balance: $0.00(€0)“
2.3 Review Exchange Rate Information
Rate Display:- Shows the current exchange rate
- Example: “$1 - €0.00”
- Displays the total transaction value in USD
- Example: “$0.00”
2.4 Add Transaction Description
Field: Description (marked with red asterisk - required)- Enter a description for your transaction
- This helps you track the purpose of the transfer
- Example: “MONTHLY BILLS”
- Placeholder: “Enter here”
Step 3: Select Your Recipient
After setting up the transaction details, you need to choose where the funds will be sent.Recipient Options:
You have two choices:Option A: My Portal Account
- Button: Select “My Portal account”
- Description: Sends funds to your linked settlement bank account
-
Best for: Regular personal withdrawals
Option B: Beneficiary
- Radio Button: Select “Beneficiary”
- Description: Sends funds to a saved beneficiary
- Best for: Sending to other people or frequently used accounts
Step 4: Choose Settlement Bank Account (If “My Portal Account” Selected)
If you selected “My Portal account,” you’ll see your Settlement Bank Account details:Bank Account Information Display:
Section Header: Settlement Bank Account- Edit Button: Click “Edit” to modify or change your bank details
- Currency: EUR (with currency icon)
- Bank Name: Example: “Wemino Bank”
- Account Name: Example: “The Co-operative Bank”
- IBAN: Full IBAN number
- Example: “GB42CPBK08005470328725”
Verification:
- Carefully verify all bank details are correct
- Ensure the currency matches your receiving currency
- Double-check the IBAN for accuracy
Step 5: Select Beneficiary (If “Beneficiary” Selected)
If you selected “Beneficiary,” you’ll see the beneficiary selection interface:Beneficiary Selection:
Section Header: Select Beneficiary (marked with red asterisk - required) Features:- Dropdown Menu: Click to view your saved beneficiaries
- Search Function: Search bar to quickly find beneficiaries
- Beneficiary Name: Example: “West Chris”
- Currency Icon: Shows the currency (e.g., EUR)
- Currency Code: Example: “EUR”
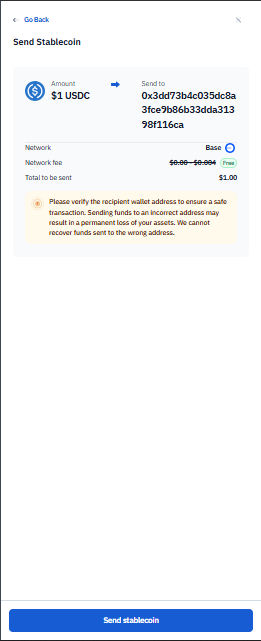
Step 6: Send Stablecoin Confirmation (For Wallet Address Transfers)
If you selected “To Wallet Address” instead of Portal Out, you’ll see a different confirmation screen:Transaction Confirmation Details:
Header: Send Stablecoin Transaction Information:- Amount: Example: “$1 USDC”
- Sent to: Complete wallet address
- Example: “0x3dd73b4c035dc8a3fcc9b65b33dda313981166a”
- Network: Blockchain network used
- Example: “Base”
- Network Fee: Transaction cost
- Example: “$0.00—$0.04” with “Max” indicator
- Total to be sent: Final amount including fees
- Example: “$1.00”
Security Reminders:
- Always double-check the wallet address
- Verify the network matches the recipient’s wallet
- Understand that blockchain transactions are irreversible
- Confirm network fees are acceptable
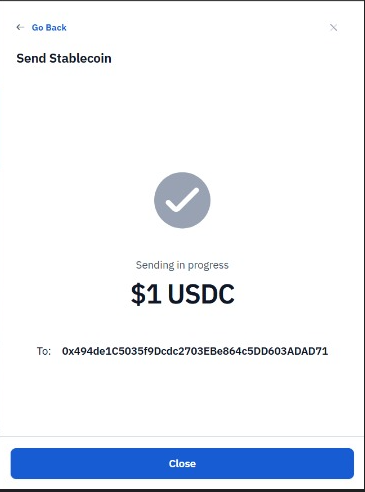
Step 9: Transaction Processing
After clicking “Proceed” or “Send stablecoin,” you’ll see the processing screen:Processing Screen Display:
Visual Indicator:- Checkmark icon in a circular badge
- Progress indicator showing transaction status
- Text: “Sending in progress”
- Amount: Example: “$1 USDC”
- To: Complete recipient address
- Example: “0x494de1c5035f9bcdc2703EBe864c5D0603ADAD71”
- Your transaction is being broadcast to the blockchain.
- Network validators are processing the transaction.
- Funds are being transferred to the recipient.
Processing Time:
- Transaction times vary by network.
- Ethereum: 1-5 minutes typically.
- Base/Polygon: Usually under 1 minute.
-
Portal Out to bank: 1-3 minutes.
Step 10: Transaction Completion
Bank Settlement (For Portal Out):
- Funds typically arrive in 1-3 minutes
Transaction Setup (Shiga Wallet)
-
Shiga Wallet Details:
- Asset: USDT (Tether)
- Target Wallet Network: Base
-
Transaction Details:
- Amount: $1
- Current Returns: show conversion rate
- Rate Total: conversion rate shown
-
Bank Details:
- Bank Name: Access Bank
- Account Number.
- Account Name.
-
Review all details and click “Proceed”
Step 3: Confirm Transaction Details
-
Transaction Source:
- Asset: USDC
- Chain: Base (network)
- Amount: 1 BASE (amount to send)
-
Bank Details (note slight discrepancies from previous screen):
- Bank Name.
- Account Number.
- Account Name.
-
Click “Initiate Transaction” to proceed
Two-Factor Authentication
- For security, enter the 6-digit code from your authenticator app
- The code is being requested for the account: olivera@gmail.com
- Options:
- “Close” to cancel
- “Authorize Send” to complete the transaction after entering the code. Transaction complete and account gets credited in their default GBP/EUR account.